Have you ever had issues with putting photos on the Internet?
If you have, you’re not the only one.
Putting images or photos on a website is usually one of the most frustrating things in the world. If you can figure out how to get the images on the website they often end up too big, too small, the wrong dimensions or completely out of focus and jumbled.
Part of the reason for these issues is that the admin areas of some websites are difficult to understand. In developer speak, these admin areas are called content management systems or simply your CMS.
WordPress is a CMS and it’s one of the most popular ones for website and blog owners. WordPress is actually one of the easier systems to use when it comes to images, but I still find myself having issues on occasion.
So I’m going to go through a few of the common issues with uploading images to WordPress, why they happen and how to avoid them.
Issue – Wrong Size
There are a few reasons for this so we’ll try to cover each of the potential causes for having the wrong size image on your WordPress site; specially a WordPress blog post.
Cause #1 – Today’s Camera’s Take Big Photos
Cameras today, even iPhones, take photos with high resolution, which in terms of the Internet is a lot of pixels.
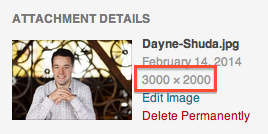
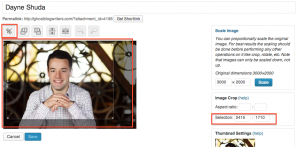
Here’s a snapshot of a photo I uploaded to WordPress:
You see those giant numbers next to the photo?
Those are the pixels of the photo. It’s 3,000 pixels wide by 2,000 pixels tall.
It’s not bad that you’re taking huge images. It gives you more detail, but if you put a full size image on your site it’s going to be way to wide and too tall. Most websites and blog posts have content areas for about 600 pixels wide give or take a couple hundred pixels.
Cause #2 – Your Image Is Vertical
Another common issue with image and websites is that many people take vertical photos. The example above is a horizontal image. Those tend to cooperate better in the online world.
Vertical images, however, make things difficult. It’s possible to us them, but they often get too big and make you scroll to see the entire image when you’re looking at it on a web page or blog post.
Cause #3 – Using The Wrong Media Setting In WordPress
WordPress has three settings for uploading images and putting them in blog posts. These are nice, but you have to make a couple customizations to take advantage. See Fix #3 for info on how to set these so you can use them properly.
Fix #1 – Change The Size Of Your Photo Before Uploading
The first option you have is to change the size of your photos before uploading them to your site.
It’s often best to do this because if you only upload the exact size photo you need to your site you lessen the load on your server. Instead of having huge photos on your server you use only what you need and become more efficient.
I use a Mac so the best way for me to do this is with Preview. You open up the image click on Tools and Adjust Size.
One thing you’ll have to do at this point is figure out the width of your content area.
Again, on a Mac you can do this a couple ways.
First, You can take a quick screenshot of your content area. When you use that tool it will give you the pixel size of your screenshot.
Another way is to right-click in your content area and select Inspect Element:
It will tell you how wide your content area is. I’ll usually make the photo a little smaller than that so something like 775 or 750.
Fix #2 – Change The Size Of Your Photo In WordPress
You can also adjust the size of images in WordPress.
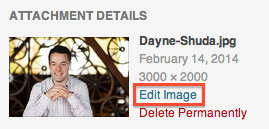
Step 1 – Edit Image
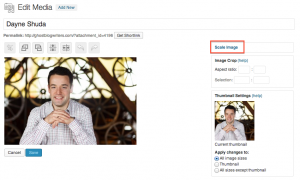
Step 2 – Scale Image
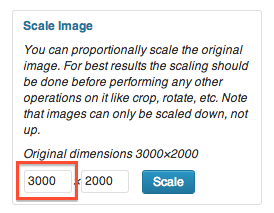
Step 3 – Adjust The Width
Step 4 – Crop
You can also crop the image in the Image Editor. It’s a little touchy, but drag your arrow cursor on the image. The scale will change as you move your cursor. Once you’re done hit the Crop button at the top left and your image will be cropped.
Fix #3 – Set Your Media Settings To Your Blog’s Settings
Another way to fix things is to set your media settings within your WordPress admin. This is the one I use most often.
Step 1
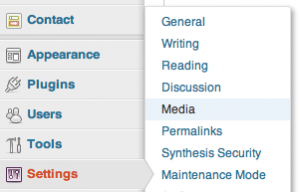
Go to your WordPress Dashboard. On the left side hover over Settings and select Media.
Step 2
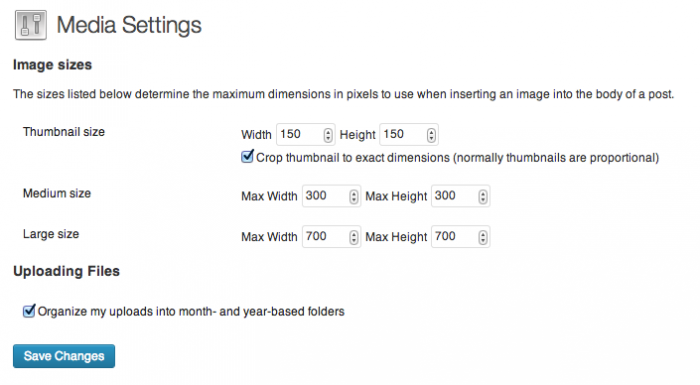
Change the settings for your Large image. This is where you set the width to match your content area width. My content width is 778px, but I set the Large image to be 700px.
Last Thought – Back To The Image Editor
This is where things can get crazy.
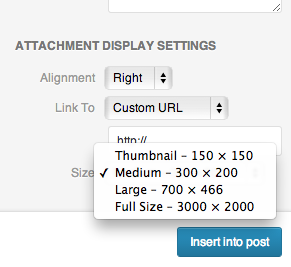
When you upload an image and go to add it to your post you’ll see this section under the image just before you hit “Insert Into Post”.
In general, you’ll mostly use Alignment – None. You can see that mine is set to Right.
The image at the top of this post is Alignment Right. The other images are set to None.
On occasion I use Center.
The other important item is the Size. I’ve selected that here. You can use the Thumbnail, Medium, Large or Full Size. We just adjusted the Large setting in the step above.
If your images are too small or too big this could be the culprit.
Sometimes you’ll upload an image that is the size you want, but it will show up too small. It might be because the setting was set to use the Medium size of the image.
Conclusion
Hopefully these tips can help you when you’re uploading photos and images to WordPress. It’s one of the most frustrating things about managing a blog or website. I know it’s frustrated me more times than I care to remember, but over time you learn how things work and how to make sure that most issues don’t happen.
Best of luck with your photos!

